
We get requests to recover data from a secondary platform all the time. RPO (recovery point objective) of 30 minutes can be challenging to small to medium sized companies, especially if there is an SLA (service level agreement) to meet.
This week, my team and I took some time to create a FreeNAS replication demo for a potential client. I thought I document the whole thing about ZFS replication, the key steps to set it up and show how recovery is done.
ZFS Snapshots
ZFS replication relies on periodic ZFS snapshots. ZFS snapshot is an inherent feature from the ZFS file system, and often used as a point-in-time copy of the existing ZFS file system tree in memory. Once a snapshot has been triggered, either manually or on schedule (periodic), the file system tree and its metadata in the memory are committed to disk to ensure an updated and consistent state of the file system at all times.
To start, a running snapshot policy on a schedule must be in place. This snapshot policy can be on a specific dataset or zvol, or even the entire zpool. Yeah, I am using quite a few ZFS terminology here – zpool, zvol, dataset. You can read more about each of the structures and more here.
Once the ZFS replication task has been setup, every snapshot occurred in the snapshot policy is automatically duplicated and copied to the target ZFS dataset. Usually, the target ZFS dataset is on a secondary FreeNAS storage server, serving as a disaster recovery platform. Sending and receiving data in the snapshots rely on SSH service.
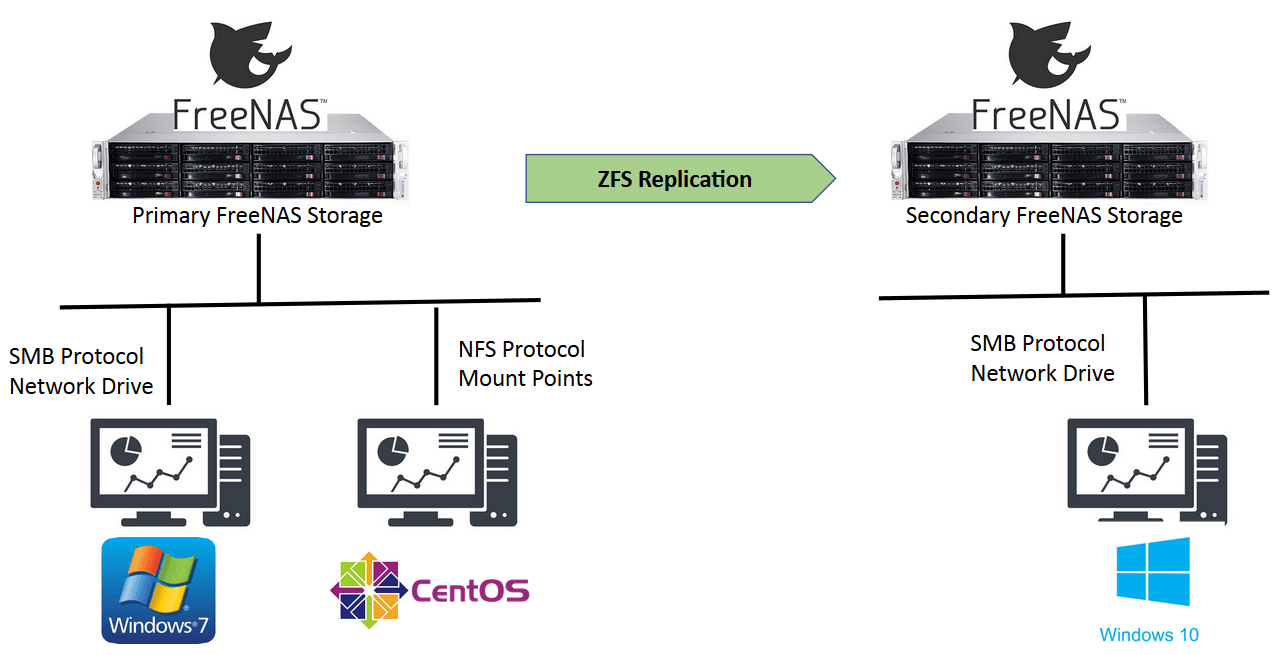
This is the network diagram explaining the FreeNAS ZFS replication setup.
FreeNAS Periodic Snapshots
ZFS replication starts with ZFS snapshots on the Primary FreeNAS storage, which is shown below.

Things to do on the Secondary Storage (Receiving)
On the secondary system, there are several key steps to configure. The first is to have the SSH (secure shell) service turned on. I enabled root access for simplicity but you can have the FreeNAS replication task tied to a specific user. FreeNAS SSH service setup shown below:  Another configuration is to get the Replication Token from the FreeNAS secondary storage. Navigate Task > Replications
 The Replication Token is a temporary authoritative token to allow the FreeNAS primary storage to establish a replication relationship with the FreeNAS secondary storage. Copy and paste the Replication Token to the FreeNAS Primary storage in the Replication Task setup.
 On the secondary storage, I have also setup a zpool, pool0/backup to be the target dataset to receive the replicated snapshots from the Primary storage
Things to do on the Primary Storage (Sending)
On the FreeNAS Primary storage, navigate Tasks > Replication Tasks and Add
 Switch the Setup Mode to Semi-Automatic and input FreeNAS Secondary storage IP address as the Remote Hostname. Paste the temporary Replication Token from the Secondary storage to the Remote Auth Token. Once this configuration is saved, the ZFS replication relationship is established between the FreeNAS Primary and the Secondary storage.
Recovery of data from replicated snapshots
The replicated snapshots are in Read-only mode. And they will populate the FreeNAS secondary storage. In order to get a Read-Write version of the replicated dataset for recovery reasons, choose the required snapshot to recover and Clone it.
 The cloned dataset will be available to the zpool. Just set the Permission to this dataset and Share this dataset either to Windows (SMB) or Linux/Unix (NFS). In my demo, we showed that the Windows files are recovered and usable from the FreeNAS secondary storage.
 Quick and Easy

In this demo, we are able to show how a simple “disaster recovery” can be setup in less than an hour with FreeNAS. In fact, it took me just over 30 minutes. And in about 15 steps or so, the whole ZFS replication is up and running.
Conclusion
Many small medium companies perspire when the DR word is introduced. There is a notion that only the large organizations implement DR. In Malaysia, all the banks are required to have DR, and I believe that unwanted association of DR to a high cost remained till this day.
But I have demonstrated that DR does not have to be costly. With a little bit of practice and knowledge of ZFS, this is DR made easy.
Note: This entire demo was setup using 2 FreeNAS instances running in Virtualbox on Windows 7.

Pingback: BSD Link Roundup 11.18 - FreeBSDNews.com
Really helpful. Gracias